

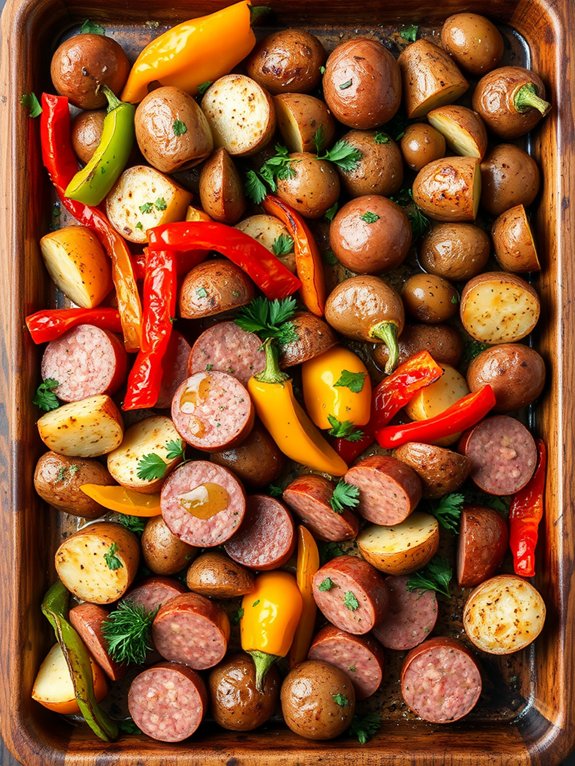
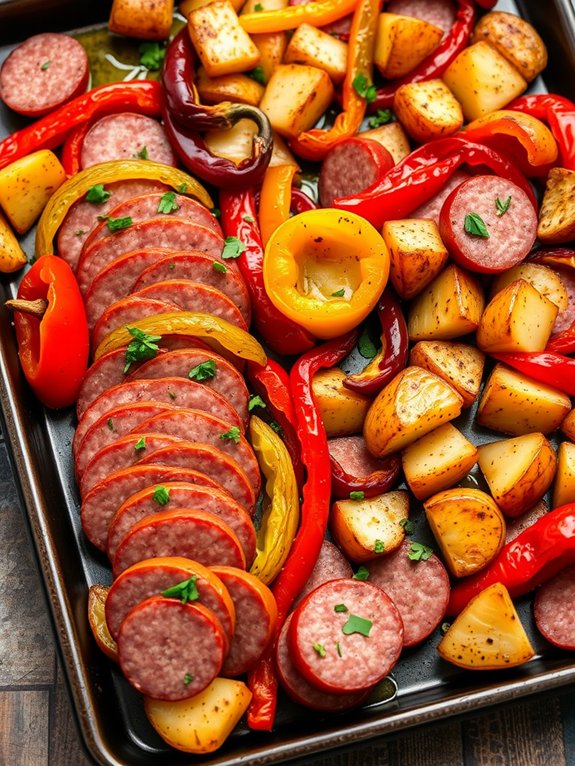
Kielbasa Sheet Pan Meal
A kielbasa sheet pan meal is a delightful way to whip up dinner with minimal fuss! Start by preheating your oven to 400°F and chop up colorful veggies like bell peppers and zucchini. Toss them with some olive oil, garlic, and seasonings for a flavor boost. Spread everything on a sheet pan, making space for juicy kielbasa sausages to shine. Roast for about 25-30 minutes until golden and crispy, and don't forget to add fresh herbs before serving! It's adaptable too, letting you switch up veggies or spices as you like. There's even more fun to explore, so keep that excitement going!
Recipe Highlights
- Roast kielbasa and colorful veggies like bell peppers and zucchini on a sheet pan for a quick, flavorful meal.
- Preheat your oven to 400°F (200°C) for optimal cooking results.
- Toss chopped veggies with olive oil, salt, and pepper before arranging them on the pan.
- Bake for 25-30 minutes, tossing halfway to achieve even browning and a golden kielbasa crust.
- Customize with seasonal vegetables, spices, or drizzle sauces for added flavor before serving.
Ingredients You'll Need
To whip up a delicious Kielbasa Sheet Pan Meal, you'll need a handful of essential ingredients that bring flavor and satisfaction.
First up, grab some juicy kielbasa sausages. These smoky delights are the star of the show, adding a hearty, savory punch to your dish.
Next, you'll want some colorful veggies. Think bell peppers, red onions, and zucchini—these not only add vibrant hues but also boost the meal's nutritional value.
Don't forget about the potatoes! Chopped baby potatoes or sweet potatoes will give your meal a comforting, filling base.
To elevate the flavors, you'll need olive oil, garlic, and your favorite spices, like paprika or Italian seasoning. A sprinkle of salt and pepper will tie everything together beautifully.
For a touch of freshness, consider adding some fresh herbs like parsley or thyme right before serving. They'll brighten up the dish and make it even more tempting.
Additionally, using non-stick cookware can make the cooking process smoother and enhance the overall experience.
With these ingredients in hand, you're well on your way to creating a sheet pan masterpiece that's not just easy to prepare but also packed with scrumptious flavors.
Preparation Steps
Now that you've gathered all your ingredients, it's time to bring your Kielbasa Sheet Pan Meal to life. First, preheat your oven to 400°F (200°C). This will guarantee that everything cooks evenly and gets that delightful roasted flavor.
Next, grab a large sheet pan and start chopping your vegetables. Aim for bite-sized pieces so they cook through nicely.
Once your veggies are ready, toss them in a bowl with olive oil, salt, and pepper. You want them to be evenly coated for maximum flavor.
Here's a quick checklist to help you stay on track:
- Chop the kielbasa into thick slices.
- Cut your favorite vegetables (bell peppers, potatoes, onions, etc.).
- Toss veggies with oil and seasonings.
- Arrange everything evenly on the sheet pan.
- Make room for the kielbasa slices.
Using a heavy-gauge material for your sheet pan can enhance heat distribution and prevent warping during cooking.
Cooking Instructions
After you've arranged the veggies and kielbasa on the sheet pan, slide it into the preheated oven and let everything roast for about 25-30 minutes. As the aroma fills your kitchen, you'll feel the excitement building!
Halfway through, take a quick peek to see how things are coming along. If you notice the veggies are browning nicely, give them a gentle toss with a spatula to guarantee even cooking.
Keep an eye on the kielbasa; it should develop a beautiful golden crust that'll make your mouth water! If you like a little extra crispy goodness, you can crank the oven up to broil for the last few minutes, but watch it closely to avoid burning.
When the timer goes off, carefully remove the sheet pan from the oven, and let it rest for a few minutes. This allows the flavors to mingle and makes serving easier. Using a high-lipped design can help prevent any spillage while roasting.
Trust me, that vibrant mix of roasted veggies and kielbasa will have you keenly diving in. Grab your favorite serving dish, and enjoy your colorful, delicious meal that's as easy to make as it's to devour. Bon appétit!
Customization Ideas
Customization opens up a world of possibilities for your kielbasa sheet pan meal.
You can easily adapt this dish to suit your taste buds or whatever ingredients you have on hand.
Get creative and let your culinary imagination run wild!
Here are some fun ideas to personalize your meal:
- Veggie Variety: Swap out the traditional veggies for seasonal options like sweet potatoes, asparagus, or zucchini.
- Spice It Up: Add your favorite spices or herbs, such as smoked paprika, thyme, or even a pinch of chili flakes for that extra kick.
- Cheesy Delight: Sprinkle some shredded cheese on top during the last few minutes of baking for a gooey, melty finish.
- Saucy Twist: Drizzle a tangy barbecue or zesty mustard sauce over the top right before serving for a burst of flavor.
- Protein Options: Experiment with different sausages, like turkey or chicken, to create a lighter version or even try adding bacon for a smoky touch.
- Nutrient Preservation: Steaming vegetables before adding them to your sheet pan can enhance nutrient retention while maintaining their vibrant colors and flavors.
Serving Suggestions

Once you've crafted your personalized kielbasa sheet pan meal, it's time to think about how to serve it for maximum enjoyment. First, grab a vibrant platter or a rustic wooden board to showcase your colorful medley of roasted vegetables and smoky kielbasa. This not only makes for a stunning presentation but also gets your guests excited to dig in!
Consider pairing your meal with a revitalizing side salad. A simple mix of greens, cherry tomatoes, and a tangy vinaigrette can provide a lovely contrast to the hearty flavors of the kielbasa.
If you want to elevate the experience, serve some crusty bread on the side. It's perfect for soaking up those delicious juices!
Don't forget about the finishing touches! A sprinkle of fresh herbs—like parsley or dill—adds a burst of color and flavor. For an extra kick, place a small dish of spicy mustard or tangy barbecue sauce on the table for dipping.
Lastly, don't rush the meal. Enjoy it with your favorite drink, be it a crisp beer or a revitalizing iced tea, and savor every bite of your delightful creation! You're sure to impress everyone at the table! Additionally, using a durable material for your serving platter ensures it withstands the rigors of entertaining while maintaining its elegance.
Frequently Asked Questions
How Many Servings Does This Kielbasa Sheet Pan Meal Yield?
When you're whipping up a delicious dish, knowing how many servings it yields is vital!
Typically, a well-prepared meal serves about four to six people, depending on appetites and sides.
You want everyone to feel satisfied, right?
So, whether you're hosting a cozy dinner or a lively gathering, just keep that serving size in mind.
It's all about sharing the joy of good food with friends and family, after all!
Enjoy!
Can I Use Frozen Kielbasa for This Recipe?
Absolutely, you can use frozen kielbasa for this recipe!
Just remember, it'll need a little extra time in the oven to thaw and cook through, like a snowman basking in the sun.
Slice it while still frozen for easier handling, and toss it onto your sheet pan with the veggies.
The flavors will meld beautifully, creating a delightful dish that warms your heart and fills your belly with joy.
Enjoy!
What Type of Kielbasa Is Best for This Dish?
When it comes to choosing the best kielbasa for your dish, go for smoked kielbasa! Its rich, smoky flavor will elevate your meal to new heights.
You might also enjoy the classic Polish variety, which is juicy and packed with spices. If you're feeling adventurous, spicy kielbasa adds a kick that can thrill your taste buds!
Whichever type you pick, you're in for a delicious experience that'll leave you craving more!
How Long Can Leftovers Be Stored in the Fridge?
Did you know that nearly 40% of the food we prepare ends up as leftovers? It's a staggering thought!
You can store your leftovers in the fridge for about three to four days, so don't let them go to waste. Just make sure you keep them in airtight containers to maintain freshness.
When you're ready to dig in again, those flavors will still be bursting with deliciousness. Enjoy every savory bite!
Is This Meal Suitable for Meal Prep?
This meal's perfect for meal prep.
You can whip up a big batch, portion it out, and store it in the fridge or freezer for quick, tasty lunches or dinners throughout the week.
Just imagine grabbing a satisfying dish, packed with flavor, when you're short on time!
Plus, the flavors meld together beautifully as it sits, making it even more delicious.
Get ready to enjoy stress-free meals that keep you fueled and happy!


