

Cheese Steak Homemade Hamburger Helper
You're about to make a cheese steak homemade Hamburger Helper that's bursting with flavor and incredibly satisfying! Start by browning one pound of juicy ground beef, then sauté onions and bell peppers until golden and sweet. Cook your favorite pasta—elbow macaroni or rotini is perfect! Mix everything together, adding a cup of shredded provolone, cheddar, or mozzarella for that melty goodness. Simmer until all the delicious flavors meld! Serve it up in colorful bowls, and don't forget a toppings bar for extra fun! Trust me, your taste buds are in for a treat, and there's so much more to discover!
Recipe Highlights
- Use 1 pound of 80/20 ground beef as a flavorful base for your homemade Cheese Steak Hamburger Helper.
- Sauté bell peppers and onions in olive oil for sweetness and crunch, enhancing the dish's flavor.
- Cook elbow macaroni or rotini until al dente to provide the perfect texture for the meal.
- Combine cooked pasta, seasoned beef, sautéed vegetables, and 1 cup of shredded cheese for a creamy, cheesy consistency.
- Customize with optional ingredients like jalapeños or a toppings bar for personalized flavor experiences.
Ingredients Needed
To whip up a delicious Cheese Steak Hamburger Helper, you'll need a handful of key ingredients that come together to create a satisfying meal. Start with ground beef, about one pound, because it's the hearty base of your dish.
Next, grab a bell pepper and an onion; these colorful veggies add crunch and sweetness that'll elevate your flavors. Don't forget the garlic! A couple of cloves minced up will give your helper that aromatic kick.
Now, let's talk cheese, the star of the show! A generous cup of shredded provolone or cheddar will melt beautifully, creating that gooey goodness everyone loves.
You'll also need beef broth, about two cups, to keep everything moist and flavorful. For the pasta, opt for elbow macaroni, perfect for soaking up all those tasty juices.
Finally, gather some seasoning: salt, pepper, and maybe a dash of Italian seasoning for an extra zing. Using high-grade stainless steel cookware can enhance your cooking experience by ensuring even heat distribution and durability.
Once you've got these ingredients ready, you're only a few steps away from a heartwarming, cheesy masterpiece that's sure to please your family and friends.
Preparing the Meat
Before you plunge into cooking, make sure to prepare the meat properly for your Cheese Steak Hamburger Helper. Start by selecting a good-quality ground beef, ideally with a nice fat content—about 80/20 is perfect for flavor and juiciness.
Take a moment to let that beef sit at room temperature for about 15 minutes; this helps it cook more evenly.
Next, grab a sharp knife and chop your beef into smaller chunks if it's in one solid piece. This'll make it easier to brown when you hit the pan. Season it generously with salt and pepper; don't skimp here! You want to build layers of flavor from the get-go.
Once your beef is ready, heat a large skillet over medium-high heat. When the pan's hot enough, add the meat and break it apart with a spatula. The sizzling sound is music to your ears!
Keep an eye on it and stir occasionally, ensuring every bit gets that beautiful, golden-brown color. Cooking it this way makes for a juicy, flavorful base for your Cheese Steak Hamburger Helper that'll leave everyone wanting seconds! Additionally, using a well-seasoned cast iron skillet can enhance the browning process due to its excellent heat retention capabilities.
Sautéing the Vegetables
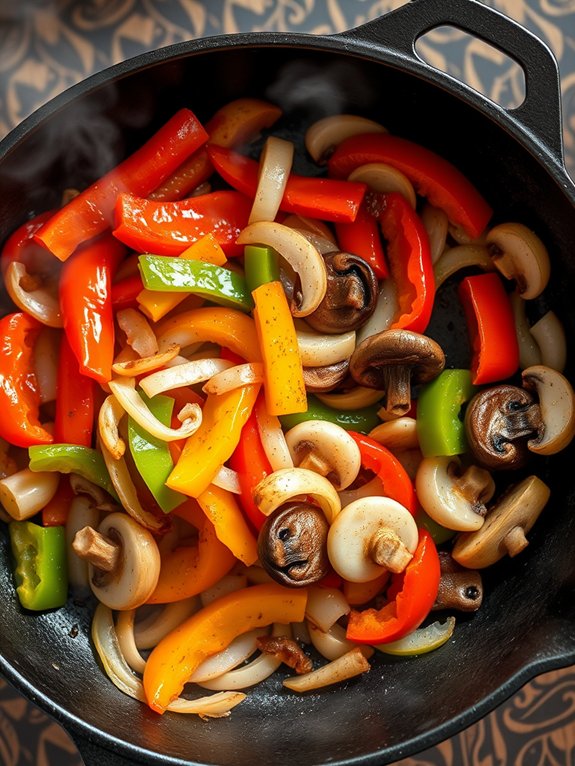
Sautéing the vegetables is a key step that elevates your Cheese Steak Hamburger Helper. When you toss those fresh veggies into the pan, magic happens! You'll want to use a mix of bell peppers, onions, and maybe even some mushrooms for that extra depth of flavor.
As they hit the sizzling skillet, watch them soften and caramelize, filling your kitchen with an irresistible aroma. Start by heating a drizzle of oil in a large skillet over medium heat. Then, add your sliced onions and let them cook until they're translucent and slightly golden.
Next, throw in the bell peppers and, if you're feeling adventurous, a pinch of garlic. Stir it all together and let those flavors meld. You'll see the colors brighten, and the veggies will become tender yet still have a nice crunch.
Don't rush this part; it's where the flavor really kicks in! The sautéing process enhances their natural sweetness and adds a nice depth that'll bring your dish to life. Additionally, using a non-stick skillet can help ensure that the vegetables cook evenly without sticking, promoting effective heat distribution for optimal cooking results.
Cooking the Pasta
Once the vegetables are beautifully sautéed, it's time to cook the pasta, which will serve as the hearty foundation for your Cheese Steak Hamburger Helper.
Grab a pot and fill it with water, then bring it to a rolling boil. Don't forget to add a generous pinch of salt—this little trick enhances the pasta's flavor!
Once the water's bubbling, toss in your favorite pasta. Whether you're using elbow macaroni or rotini, it'll all work perfectly.
Stir the pasta gently to prevent it from sticking together. Now, keep an eye on the clock! Follow the package instructions for cooking time, usually around 8 to 10 minutes. You want it al dente, which means it should have a slight bite to it.
While the pasta cooks, take a moment to savor the delightful aroma of those sautéed vegetables wafting through your kitchen. It's a sign that something delicious is coming together! Remember, using high heat resistance materials for your cooking tools can make a difference in achieving optimal results.
When the pasta's ready, drain it in a colander and give it a quick rinse with cold water. This stops the cooking process and helps maintain that perfect texture.
Now you're ready for the next exciting step in creating your cheesy masterpiece!
Combining the Mixture
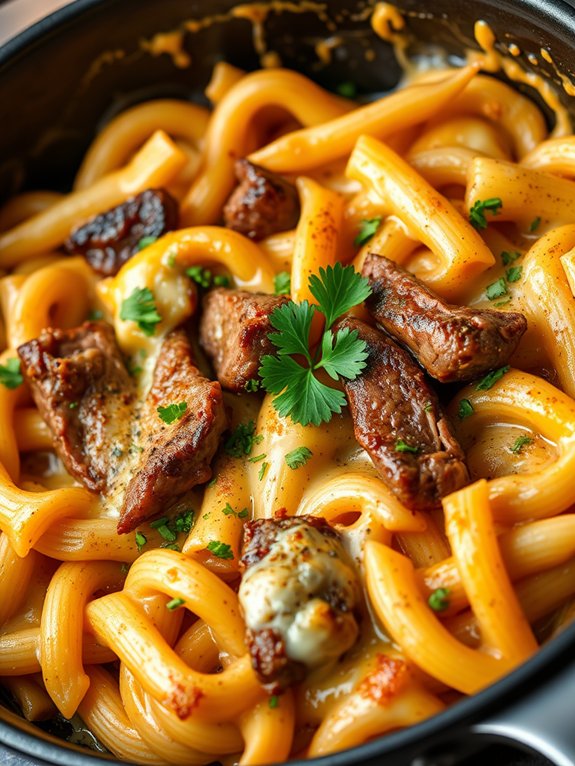
Now it's time to bring all those delicious elements together! You've got your perfectly cooked pasta, seasoned ground beef, and those vibrant veggies just waiting to shine.
Start by grabbing a large mixing bowl or a skillet, whichever you prefer, and toss in your pasta first. It's the heart of this dish, so make sure it's nice and evenly spread out.
Next, add your cooked ground beef to the mix. You'll want to fold it in gently to keep those pasta pieces intact while allowing the flavors to mingle beautifully.
Then, throw in your sautéed onions and bell peppers. Their sweetness and crunch will elevate your dish, adding that classic cheesesteak vibe.
As you combine everything, don't be afraid to use a spatula or wooden spoon to really incorporate all those colorful ingredients. The aroma that fills your kitchen will have your taste buds dancing with excitement!
Make sure everything is well-coated, and take a moment to admire the vibrant colors before moving on. You're just a step away from creating something truly delicious, so let's keep the momentum going!
Additionally, using a piping bag can help you achieve a more decorative finish when adding toppings or sauces to your dish.
Adding the Cheese
The joy of a cheesesteak dish truly shines when you add the cheese, transforming your mixture into a creamy, indulgent delight.
Imagine this: as you sprinkle that cheese over your bubbling skillet, it begins to melt, enveloping every morsel of meat and veggies in its gooey goodness. You can't help but smile as the aroma fills your kitchen, enticing everyone nearby.
To make the most of adding cheese, consider these tips:
- Choose the right cheese: Provolone, Cheez Whiz, or even mozzarella will elevate your dish.
- Add it at the right time: Incorporate cheese just before serving for that perfect melt.
- Mix it up: Experiment with a blend of cheeses for a unique flavor profile.
- Be generous: Don't skimp! More cheese means more happiness.
- Consider melting techniques: Cover your skillet to let the steam work its magic.
As you stir the cheese into your mixture, watch it become a beautiful, velvety blend that'll have everyone coming back for seconds.
Incorporating a variety of cheeses can enhance the dish due to the importance of blade material quality in ensuring precision when slicing your ingredients.
Trust me, this is the moment your homemade cheesesteak hamburger helper becomes a true crowd-pleaser!
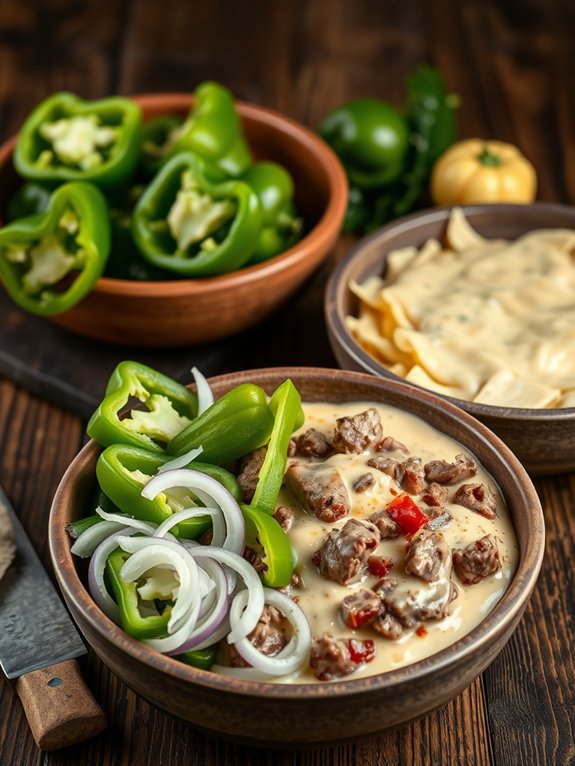
Serving Suggestions

When it comes to serving your Cheese Steak Hamburger Helper, presentation can elevate the dish to new heights. Start by dishing it up in vibrant, colorful bowls or plates that make the rich, cheesy goodness pop! You can garnish it with freshly chopped parsley or green onions for a splash of color and a burst of flavor.
Consider pairing your sumptuous meal with crispy, golden fries or a fresh garden salad. The contrast between the savory cheese steak and the crunch of the salad adds an enjoyable texture.
If you're feeling adventurous, serve it in a toasted hoagie roll for a fun twist that mimics a classic cheese steak sandwich.
Don't forget about the sides; a tangy dipping sauce or a zesty salsa can take your dish to the next level! You might even want to set up a toppings bar with items like jalapeños, extra cheese, or pickles, letting everyone customize their own plate. Additionally, using durable materials for your serving platters ensures they can withstand the excitement of a lively meal.
With just a little effort, you can transform an everyday meal into a delightful dining experience. So grab your friends or family, and dig in; they're going to love it!
Storage Tips
Properly storing your Cheese Steak Hamburger Helper guarantees you can enjoy those delicious leftovers later without sacrificing flavor or texture.
To make the most of your meal prep, you'll want to follow a few simple storage tips. First, let your dish cool down to room temperature. This helps prevent condensation, which can make your food soggy.
Next, grab an airtight container for the best results! Here are some key storage tips to keep in mind:
- Refrigerate promptly: Store leftovers within two hours of cooking.
- Use airtight containers: This keeps moisture in and prevents odors from seeping in.
- Label and date: Write the date on your container so you know when it's time to eat it or toss it.
- Freeze for longer storage: If you won't eat it in a few days, put it in the freezer—great for last-minute meals!
- Reheat carefully: When you're ready to enjoy it, reheat slowly on the stove or in the microwave, adding a splash of broth or water for moisture. Additionally, using airtight seals can help maintain meal freshness and prevent spills during transport.
Frequently Asked Questions
Can I Use a Different Type of Cheese for This Recipe?
Absolutely, you can use a different type of cheese for this recipe!
Whether you fancy creamy mozzarella, sharp cheddar, or zesty pepper jack, each choice brings its own flair.
Think about the flavors you want to highlight and how they'll blend with your dish.
Don't be afraid to experiment—cooking should be fun!
How Can I Make It Gluten-Free?
To make your dish gluten-free, swap out any traditional pasta or breadcrumbs with gluten-free alternatives. You can use rice noodles, quinoa, or even gluten-free pasta blends.
Check labels on sauces and seasonings to verify they're gluten-free, too! If you're feeling adventurous, create a delicious base with cauliflower rice or spiralized veggies.
Your meal will still be packed with flavor and texture, making it a hit for everyone at the table! Enjoy!
Is There a Vegetarian Version of This Dish?
Absolutely, you can whip up a delicious vegetarian version!
Swap out meat for hearty ingredients like mushrooms, bell peppers, and zucchini. Sauté them with onions and garlic for that savory kick.
Use a rich vegetable broth combined with your favorite seasonings to infuse flavor. Add in some cheese or a vegan alternative to make it creamy and satisfying.
You'll have a delightful dish that even meat lovers will enjoy—trust me, it's a crowd-pleaser!
How Long Does Leftovers Last in the Fridge?
Leftovers can be a lifesaver, right? In the fridge, they'll typically last about three to four days.
Just make sure you store them in an airtight container to keep them fresh and tasty! If you notice any funny smells or changes in color, it's best to toss them out.
You've put in the effort to create a delicious meal, so savor those leftovers while they're still at their prime! Enjoy every bite!
Can I Freeze the Cheese Steak Hamburger Helper?
Absolutely, you can freeze that delicious creation!
Just scoop it into an airtight container, leaving a little space at the top for expansion. Seal it tightly, and it'll be good for about three months in the freezer.
When you're ready to enjoy it again, thaw it in the fridge overnight, then heat it up on the stove or microwave.
You'll have a tasty meal waiting for you—like magic! Enjoy every bite!


